macOS Security Update 2017-001

https://support.apple.com/en-us/HT208315

Highly recommended security update that everyone running High Sierra needs to install. Patches a bug that allows the creation and authentication of a root user account without a password. If you have automatic updating turned on for security updates, you should have it automatically download and install. Otherwise check the App Store > Updates tab for the security update.

This is yet another blunder by Apple’s macOS engineering team. The software QA is reaching a new low and its really disappointing. So far its not enough to make me switch back to using Windows full time, but if this continues I am definitely going to consider it.

The iPhone X Review

The iPhone X is possibly the most anticipated iPhone since the original iPhone. It represents the most drastic change in the 10 year evolution of the smart phone that took over the world and is helping propel Apple into becoming a 1 trillion dollar company. I had been closely following rumors of this phone once my iPhone 6 had started showing its age last year. Once I knew about the edge to edge display and facial recognition capabilities I knew I had to jump on the hype train and buy it come release day. And here we are, 24 hours after the launch, and I am still damn impressed with the phone.

Build quality

Apple simply knocked it out of the park as always. I thought my iPhone 4 and 6 were well built but the X is on another level. The finishing and attention to detail is impeccable. The glass back and stainless steel band in “Space Grey” look fantastic. Feels heavy and very high quality, but still relatively comfortable to hold. The way the screen just curves into the band and rest of the body is just perfect. I really can’t say enough about the way the phone looks and feels, you really need to see it for yourself.

The screen

The OLED screen on the iPhone X is something really special. It is arguably the best OLED screen you can find on a smartphone right now. According to Apple, although the display is manufactured by Samsung, it was custom designed for the X. It is PenTile, supports HDR10 and Dolby Vision, runs at 60hz but samples at 120hz, and goes from edge to edge of the phone (except for the notch). I can safely say this is the best screen ever put on an iPhone and the best screen I have ever seen on a mobile device. Colors are crisp and the blacks are very deep, with just the right amount of contrast without making it look like a over saturated Galaxy S8 or Note. It gets very bright when you need to use it outside and dims to about the same level as previous iPhone LCD displays when you need to use it in the dark. The only thing that I’d be worried about is burn-in over time which is common with all OLED displays. Apple has said they have used hardware and software to mitigate this but we won’t know for a while. As for now though it really is a great display.

Face ID and the TrueDepth camera system

This is probably my favorite part of the iPhone. Since working with the Kinect over summer I have been interested in depth sensing cameras and getting to see one in an iPhone is very exciting. Using technology pioneered from PrimeSense and perfected over time at Apple, the TrueDepth camera system is an engineering marvel. What used to be found in a device as large as the Kinect now occupies the small notch at the top of the smartphone. The main purpose of this setup is for Face ID, which in my testing has been working very well. I have tested it in darkness, daylight, and with sunglasses all of which work well. It does struggle with certain angles and works best in darkness as some lighting does not play so well. I also found out that it did not work when I had my glasses off, maybe because I trained it while wearing my glasses. It is not perfect but I would say that it is still faster than the Touch ID sensor found in my iPhone 6. Apps that already use Touch ID will work with Face ID, which is a plus. I did notice that apps that have not been updated to prompt for Face ID displayed a message that the app was designed for Touch ID and not Face ID along with the normal prompt asking whether or not you want to let the app use Face ID. Along with Face ID, the TrueDepth camera is also used to Animoji, a feature that I honestly am not that interested in. I tried it, seems cool, but that’s all. If you want to learn more about it, read up on The Verge’s review in which Nilay Patel claims that is the best selling point of the phone.

The A11 Bionic processor

I wasn’t all that amused during the keynote when the processor powering the iPhone was dubbed the A11 Bionic. What a silly name, I mean A10 Fusion sounded cool but Bionic just sounded silly to me. Anyways, the processor packs a serious punch, with synthetic benchmarks such as GeekBench showing Apple’s silicon engineering prowess destroying competing devices like the S8 and Galaxy, benching close to MacBook Pros. In day to day use it is snappy, pretty power efficient based on my usage so far, and a huge upgrade over the A8 found in the iPhone 6. The tear down by iFixit reveals the logic board in which the A11 sits and oh boy it is really something to look at. A true silicon masterpiece that makes you just step back and realize how far the iPhone has come. A 70% decrease in the footprint over the iPhone 7/8 is extremely impressive. From an engineering standpoint it represents a pinnacle in hardware design and packaging, leveraging creative thinking with the latest in fabrication techniques. But then again, this is Apple, so it is expected.

Final thoughts

When Apple announced the iPhone X they billed it as the future of the smartphone. That really is a bold claim even coming from Apple but in a way, I think they might be right. Just looking at the density of the logic board and the TrueDepth camera, Apple is moving hardware in a new direction at a new pace. Albeit their innovation in the Mac space has greatly reduced as well as overall software quality, their new focus on iPhone hardware is refreshing since we had to deal with 3 years of the same iPhone 6 design.  The original iPhone got a lot of things right, and many of those things are still present in the X. The interface and design may have changed but the fundamental usability is still there. Here is to another 10 years of iPhone. Thanks for reading.


Microsoft discontinues the Kinect

One of the biggest headlines in tech today was that Microsoft is killing of the Xbox Kinect sensor (article here). This is quiet a blow to hackers and enthusiasts who have been using the Kinect for motion capture, 3D scanning, depth mapping, and general computer vision applications. Introduced for the Xbox 360 in 2010 and teased under the codename “Project Natal”, the Kinect was introduced with much fanfare, only to never get any popular games to play it with. Hailed as a useful accessory with the V2 release for the Xbox One, the second generation of Kinect was more powerful, accurate, and capable since you could use it via voice commands to navigate through your Xbox One. But yet again, even with this promising and advanced piece of technology game developers never really got on board and once again there were no show stopping titles available which led to its inevitable death. However, on a technical side, the Kinect will continue to live on. PrimeSense, the Israeli manufacture of the sensor and circuitry used in the original Kinect for Xbox 360 was purchased by Apple in 2013. Their technology can also be found in the ASUS Xtion which is basically a rebranded PrimeSense Carmine camera. They were arguably one of the most influential companies in the development of consumer 3D depth sensing technology, contributing to projects such as OpenNI as well as the sensor technology in general. But after the Apple acquisition, there were no more PrimeSense cameras being made, and coming back to what I said earlier about the Kinect technology living on today, is that the same structured light sensing technology is now being used in the iPhone X for Face ID. The research that led to a video game accessory that never took off is now behind arguably the biggest feature in a device that has been so hyped up and poised for one of the largest preorders of a consumer electronics device ever. It’s really astonishing once you think about it. But it doesn’t stop there, since Microsoft is continuing to push the edge on vision technologies but not with a Xbox accessory, rather a HMD for mixed reality. I’m talking about the HoloLens, which while is still in development and purchasable as development kit only, is the advancement and technological successor to the Kinect. It uses sensor technology that was pioneered by the first two Kinects and continues to build on them while taking a new approach to interaction. I am fairly certain the engineers who worked on Kinect are now all on the HoloLens team (at least I know this guy is), so I think its safe to say the Kinect is dead. As you can see on this HN post, a lot of people are saddened as am I. I worked with the Kinect all summer for my current employer. We are now looking at alternatives going forward, mainly considering the Orbbec Astra, Occipital’s Structure Sensor, and the Stereolabs ZED. As of now, none of these seem to have a mature and large SDK like that of the Kinect, nor do they offer fully integrated and functional skeletal tracking which is our main focus. Orbbec does have a beta for this, however their slow development and release pace is concerning. We’ll see.


Reverse Engineering Xamarin Forms Apps

Xamarin Forms as well as Xamarin Native rely on the Mono runtime and framework for cross platform code sharing between iOS, Android, and UWP. This means that a .NET assembly will be generated for the solution and, on Android, will use JIT compiling on the device upon runtime to translate the C# code to native Android code (Apple restricts JIT compiling on device so AOT is implemented for iOS solutions, this will come into play later).

Since this process generates a .NET assembly, we can use standard .NET decompiler tools such as ILSpy to deconstruct the assembly and have a complete, in depth look at the source code. The following is how anyone could download a Xamarin Forms app from iTunes/App Store or Google Play, extract the .NET assembly, and decompile it to view the entire source code.

iOS (Requires a Mac)

[UPDATE 9/28/17: Apple has removed the ability to download apps through the latest version of iTunes, so this method no longer works. It may continue to work on versions prior to version 12.7, but I haven’t tested this.]

[UPDATE 10/9/17: Apple has now reinstated the App Store functionality in iTunes 12.6.3. Odd move by Apple to bring it back just 2 weeks later. If you are already running 12.7, you will need to download and install 12.6.3 from here: https://support.apple.com/en-gb/HT208079]

-Open up iTunes

-Search iTunes for a Xamarin Forms app. Hit Get and then Download. The downloaded .IPA file will be found under ~/Music/iTunes/iTunes Media/Mobile Applications/

-Copy the IPA file to a temporary directory on your desktop. Rename the .ipa to app.ipa.

-In Terminal, cd into that directory and enter in unzip app.ipa. Wait until the unzip finishes.

-Open up the Payload folder and right click on AppName.iOS. Click on Show Package Contents.

-In the Finder search bar, enter in .dll. This will locate all the DLLs in the project. Find the AppName.dll file and copy it to a flash drive. We will need to decompile this dll on a Windows machine.

Android (Mac or Windows; I tested this on a Mac)

-Since we cannot directly download the .apk from the Play Store, we need to use a frontend client to download the apk for us. I used Raccoon (http://raccoon.onyxbits.de/)

-Download and open up raccoon using Terminal (java -jar raccoon.jar). Login to a Google account when prompted. Choose “Let Raccoon create a pseudo device”.

-Search for a Xamarin Forms app in the search bar. Once you have found it, hit download. Once downloaded click on show where the file was downloaded to.

-Copy the .apk to the desktop. Again use a temporary folder and run the command unzip in terminal. On Windows you could probably use 7-Zip to do this.

-Open the assemblies folder and copy AppName.dll and AppName.Droid.dll on to a flash drive for the next step of decompiling the DLLs.

DLL Decompile (Windows)

-Download ILSpy  (https://github.com/icsharpcode/ILSpy/releases/download/v2.4/ILSpy_Master_2.4.0.1963_Binaries.zip)

-Unzip it and run ILSpy.exe

-Click open and select the DLLs you want to decompile

-View the source of the DLLs

Installing macOS Sierra on a 2009 HP Pavilion laptop

For the past few years I have been trying to install OS X on my now 8 year old HP Pavilion dv6t-2000. It features a 4 core, 8 thread Intel Core i7-720QM running at 1.67GHz, a NVIDIA GeForce GT 230M graphics card, 4GB of 1067MHz RAM and a 350GB SATA HD. This hardware may seem quite old, and it is, so I have had constant trouble installing anything from Snow Leopard to Mavericks. I could never complete a installation, until yesterday. I decided to take a long and focused look at how I could complete a successful install of Apple’s latest operating system on a 8 year old machine from HP. Here are the biggest problems normally faced by someone who wants to install macOS on a laptop:

-Lack of WiFI driver support for many common adapters

-Motherboard and BIOS support

-Trackpad and keyboard

-Mobile graphics cards

-Audio and webcam

The easiest solution for WiFi use a external dongle, I used a spare Edimax EW-7811Un USB adapter which has up to date drivers for all versions of OS X starting from 10.4

-You can usually find a patch for your specific BIOS (issues such as local APIC crashing can be solved through a simple patch built into the Clover bootloader)

-VoodooPS2 solved my trackpad and keyboard issue

-NvidiaInject inside of Clover does the job perfectly for graphics support

-Since this is mainly a development/messing around computer I do not really need audio and surprisingly enough the webcam worked out of the box

Creating the install media is fairly simple thanks to the latest version of Unibeast. Download the latest copy from here. You will need a tonymacx86 account to do so. Format your USB drive to Mac Extended Journaled with GUID partition table. You will also need to download the Sierra installer from the Mac App Store. Once you have done all that select the drive you want to install to, use legacy BIOS, and let the install media be created.

Boot your installer by selecting your drive in your BIOS boot manager, you will now land on the Clover boot screen. This is the hard part, you will need to pass some boot arguments to get to the installer. Use the following arguments: dart=0 nv_disable=1 cpus=1 -v. This should allow us to eventually reach the installer. Once at the installer, we need to erase the current hard drive. Select the drive, partition to Mac Extended Journaled with GUID partition table. Erase the drive. If you run into any errors, try to force unmount the drive and run the erase again. To do this run the following:

diskutil list

and find the disk that you are installing to (internal should be /dev/disk0)

then run

diskutil unmountDisk force /dev/[disk number]

Let the drive be formatted. Proceed to accepting the license agreements and wait for the install to finish. Once it finishes and reboots, you will need to boot from the installer drive once again. Once at the Clover boot screen select the drive you installed Sierra on. Again, pass the same boot parameters. Once finished, install Multibeast from tonymacx86, run it, select legacy options, let it finish installing. Reboot, this time it should boot Clover from your hard drive. Same boot params, now get into OS X and install KextBeast from tonymacx86. Download the latest VoodooPS2 driver from here. Install it using KextBeast. Download Clover Configurator from here open it, and mount the EFI partition. Once mounted open up /BOOT/CLOVER and find the config.plist. Open it using TextWrangler or a similar code editor. Find the local APIC patch and set it to true as well as Nvidia Injector to true. Save and reboot. You will no longer need any boot arguments. Install any other drivers you need afterwards. This will give you the most basic usable operating system, its up to you on what you need working.

The install was long and frustrating as it took me a while to figure out what boot arguments to use to get into the installer, but once I got in I was able to figure out the post install relatively easily. Now for the final question, was this really worth it. Yes and no; yes because I finally learned how to do a hackintosh relatively properly and no because I was expecting the old but powerful sounding CPU to hold up its performance. In the end I got this:

Screen Shot 2017-07-07 at 8.54.24 PM.png

Yeah that is some pretty lackluster performance for a seemingly powerful GPU and CPU. But then again, this was from a first get Core i-Series CPU and a 2nd gen GeForce GT GPU. But all in all, the system is actually pretty fast. I am yet to test out compiling some Xamarin projects and I am curious if it can utilize the 4 cores for faster builds compared to my dual core MacBook Pro and Mac mini.

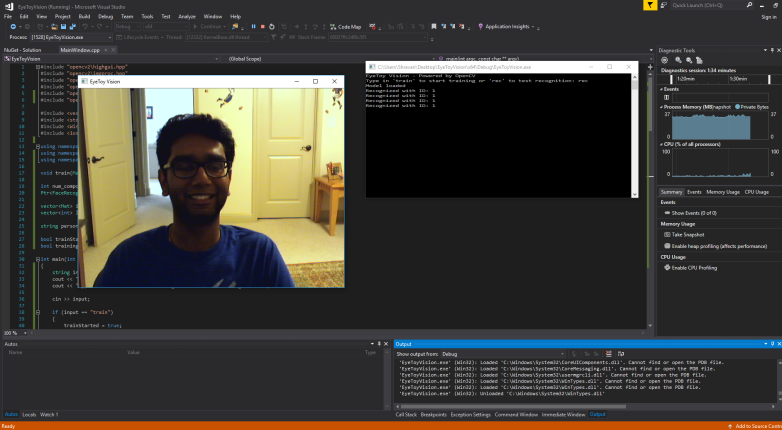
 

EyeToy Vision – facial recognition using the PlayStation 2 EyeToy camera

The PlayStation 2 EyeToy was released in 2003 and was basically a USB webcam that you could attach to your PS2 to play certain games using your body and voice commands. For my current job, I have been developing a strength training application using Microsoft’s Kinect for Xbox One which piqued my interest in computer vision. I started messing around with facial recognition on the Kinect using HD face as well as a more traditional PCA based approach using Eigen Faces from this great sample here. I then remembered that I had an old EyeToy USB camera laying around at home that I could use as a capture device and use OpenCV for some basic face recognition. I started work on it last night and now have an working(ish) example of how to use the EyeToy for facial recognition using OpenCV. Bear in mind this is the first time I have done a VC++ project so I probably didn’t do everything in an optimal way.

screenshot

Requirements:

-EyeToy USB Camera (The one I used was an early model and was manufactured by Logitech, later EyeToys were manufactured by Namtai. I have not tested the driver with a Namtai made EyeToy but I am pretty sure it will work.)

-An open USB port (does not work properly with USB hubs)

-Visual Studio 2015 or higher (I compiled with VS 2017 Enterprise)

-EyeToy Vision Source Code: https://shravanj.com/files/EyeToyVision.zip

Before we can begin discussing the program, we need to install the EyeToy drivers, since there is no official PS2 EyeToy driver for Windows. I followed this guide and got it working on Windows 10: http://metricrat.co.uk/ps2-eyetoy-on-windows-8-64-bit-working/

You’ll need to download the driver (which I have uploaded to my website for your convenience here) and extract it. Once you have done that open up a command prompt window with administrator permissions. We need to temporarily disable driver signing verification so we can install the driver. Enter in the following commands:

bcdedit -set loadoptions DISABLE_INTEGRITY_CHECKS

bcdedit -set TESTSIGNING ON

From the Device Manager, find the EyeToy, right click and select Update Driver. Select let me pick from list -> have disk -> locate the unzipped driver folder and select HLCLASSIC.inf. Click continue when prompted about the unsigned driver. Once finished, re-enable driver signing enforcement like so:

bcdedit -set loadoptions ENABLE_INTEGRITY_CHECKS

bcdedit -set TESTSIGNING OFF

Verify the driver works by opening up the testing application inside the driver folder.

Now that we have the driver setup and ready, we need to prepare Visual Studio. In my initial stages of development, I tried linking OpenCV directly to VS but I never got it to work properly, so instead I found a NuGet package that manages the whole thing for me. Named opencvcontrib, it contains a x64 compiled version of OpenCV 3.1 and more importantly includes the contributed modules which contains the FaceRecognizer class which is not found in the stand alone version of OpenCV. In order for this to work, we need the Visual Studio 2015 platform tools because that was what the whole OpenCV source was built against. If you are using VS 2015 you do not need to do anything, but if you are using VS 2017 like me, you will need to install the 2015 platform tools. To do this, go to Start Menu > Visual Studio Installer. Click the menu icon for you installed VS 2017 product and select Modify. Open the Individual Components tab and scroll down to Compilers, build tools, and runtimes. Select the “VC++ 2015.3 v140 toolset (x86,x64)” and install it. You are now ready to compile the program.

I will get more in depth on the actual programming in another post, I just wanted to share my initial progress on this project.


Why your Xamarin Forms 2.3.x project stopped working in Visual Studio for Mac

(Originally published 5/11/17)

On May 10th, 2017 Microsoft launched the public release of Visual Studio 2017 for Mac. It is intended to be a replacement for Xamarin Studio as it integrates .NET Core along with Xamarin and cross platform game development components. From a UI standpoint it looks very similar to the latest version of Xamarin Studio, but under the hood a few key changes are lurking. The one I am concerned about is the switch from xbuild to MSBuild as the build system for Xamarin.iOS. MSBuild was optional before but is now the default system. For many projects, the transition is seamless, but for those who are using the outdated 2.3.x versions of Xamarin.Forms, a huge problem is evident: it does not support MSBuild at all. In fact, many builds of 2.4.x do not work, but the latest version guarantees compatibility. This was a rather perplexing problem that took me a while to figure out because I had no idea why the build process was failing in both Xamarin Studio and Visual Studio for Mac. Since the VS for Mac installer bundles the latest versions of Xamarin.iOS and Mono MSBuild is the default in both VS and Xamarin if you use them side by side on the same machine. Trying to build a project that uses the 2.3.x version of Xamarin.Forms will fail with a xbuild failure to start error on VS and a missing pdb file error in Xamarin Studio. This could be avoided if Microsoft warned about potential incompatibility with apps that rely on xbuild. This leaves me with two options: roll back to an earlier version of Mono and Xamarin.iOS (which is basically uninstalling everything and reinstalling Xamarin Studio which is a huge pain), or figuring out how to safely update to the latest version of Forms. This is tricky since there are many crucial packages in my solution that rely on this specific version of Forms, so all of them will need to be updated without breaking functionality or legacy code. This is the only way to ensure things will work properly in the future since Microsoft has stated that VS for Mac will be the future for Xamarin. This means that in order to stay up to date with Xamarin, we need to be using the latest version of Forms. This will not be an easy task, but who said cross-platform development was easy?

Update macOS through Terminal

(Originally published 4/26/17)

Downloading updates in the Mac App Store, especially Xcode, has always given me problems. Recently I discovered that you can actually update system software and 3rd party apps via Terminal using the “softwareupdate” command. To list the updates, issue “softwareupdate -l” and install them with “softwareupdate -iva” which will install all available updates. If you want to install a specific update, just use “softwareupdate -i ‘name of update'”. Make sure you have sufficient user privelages before installing.

Xamarin Tips and Tricks – Custom push notification sounds on iOS and Android

(Originally published 4/21/17)

Upon the receiving a push notification, iOS and Android will automatically use the default tone for the notification (or just vibrate if your device is set to silent). Normally, you would have to change the notification tone within settings, but if you want your app’s notification tone to stand out from the default tones, you can set your own notification tone. Today we will look at how to implement this in Xamarin.Forms (you will need a dependency service for this to work since the Android and iOS solutions use platform specific code).

iOS

Before you can use your custom notification tone, you need to have it in the .caf format for it to work inside of a push notification (MAKE SURE YOUR SOURCE FILE IS 30 SECONDS OR LESS IN DURATION). To do this on macOS, issue the following command in Terminal: afconvert -f caff -d LEI16@22050 input.mp3 output.caf. Now that you have converted the file, you need to add it to your iOS Resources directory. Inside Xamarin Studio, under your iOS solution right click on the Resources folder and click “Add files” and select your converted .caf file. Now that you have the file converted, we can build a local notification with the custom tone:


var notification = new UILocalNotification();
notification.AlertAction = "My Notification";
notification.AlertBody = "Hello world";
notification.SoundName = "output.caf";

IMPORTANT NOTE: iOS limits 3rd party apps on how long notification sounds can play to 30 seconds. Banner style alerts (the default style) only allows a few seconds, so the user will need to change the alert type to “Alerts” under Settings > Your App > Notifications > Alert Style When Unlocked. You will also need to make sure your sound file itself is only equal to or less than 30 seconds in duration.

Android

You can use a .mp3 file of any duration you see fit because we won’t actually be using the notification’s tone payload to play the sound due to some quirkiness in the way Xamarin handles custom notification tones on Android. We will actually build a notification and then use Xamarin MediaPlayer to play the tone when the notification fires. First we need to create a new folder inside of the Android solution’s Resources folder. Right click on the Resource folder and click “New folder”. Name the folder “Raw”. Now add the .mp3 file into the Raw folder. The gist below shows basic notification setup:


var pending = PendingIntent.GetActivity(context, 0,
resultIntent,
PendingIntentFlags.CancelCurrent);
var builder = new Notification.Builder(context)
.SetContentTitle(title)
.SetContentText(message)
.SetDefaults(NotificationDefaults.All)
.SetSound(RingtoneManager.GetDefaultUri(RingtoneType.Alarm));
builder.SetContentIntent(pending);
var notification = builder.Build();
var manager = NotificationManager.FromContext(context);
manager.Notify(1337, notification);
MediaPlayer player;
player = MediaPlayer.Create(context, Resource.Raw.CustomToneName);
player.Start();

IMPORTANT NOTE: Before compiling, do a clean and rebuild of the project using right click -> “Clean” and right click -> “Rebuild”. This will solve issues involving the resources folder not being compiled properly. Highly recommended every time you add new files to the folder.